
Resume Builder Guide
The Resume Builder in myBlueprint+ helps you create professional, well-formatted resumes to showcase your skills, experiences, and achievements. It offers live previews, customizable templates, and flexible layouts to help you stand out to future employers.
Before You Start
- The Resume Builder is part of myBlueprint+ and is available to student accounts only.
- Your resume title is for your reference only and does not appear on the final document.
- The Resume Builder includes Auto-Save. Your changes are saved automatically every 30 seconds and whenever you close a panel.
Accessing the Resume Builder
- Log in to your myBlueprint+ student account
- Click Work in the left-hand navigation menu
- Select Resumes from the menu options
Alternatively, click the Create a Resume card directly from your Student Dashboard.
Creating a New Resume
- On the Resumes Dashboard, click + Create Resume
- Your resume is created immediately with a default title (e.g., "Resume #1") and you are taken to the Edit Resume page
Editing Your Resume
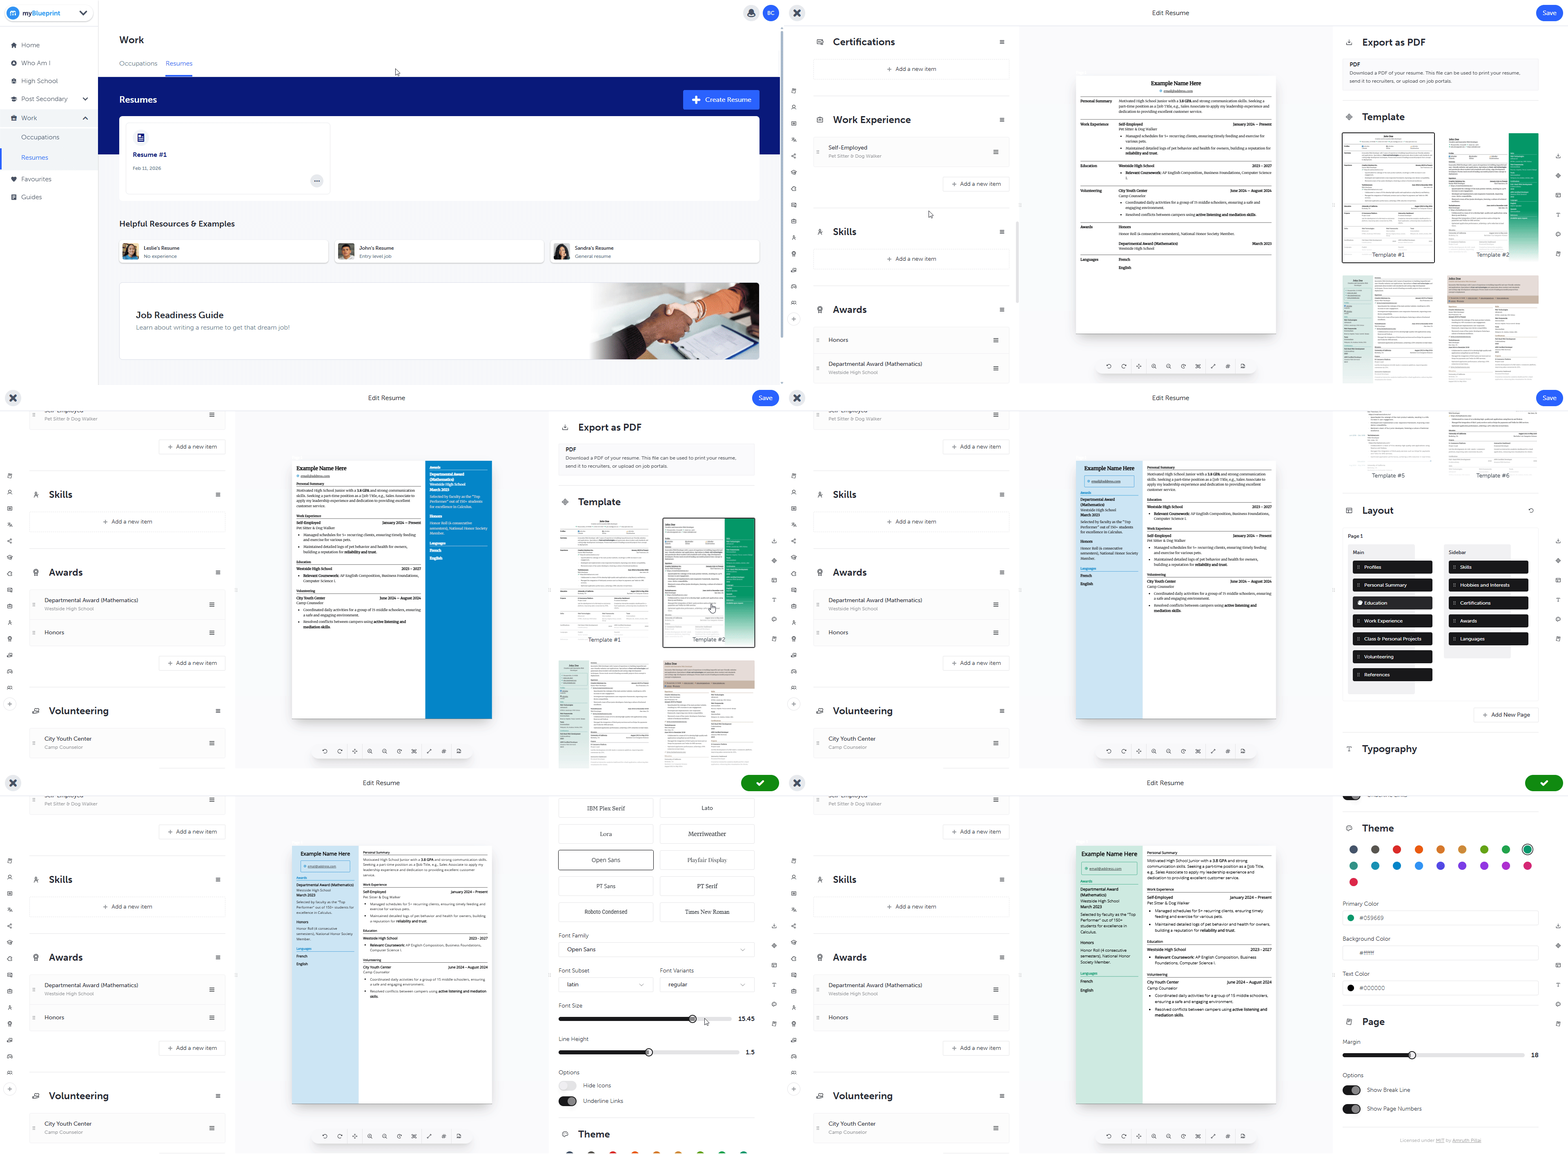
The editor is divided into three main areas:
Panel | Purpose |
|---|---|
Left Panel | Enter your information |
Middle Panel | Live preview of your resume |
Right Panel | Design settings and templates |
1. Enter Your Information
Use the Left Panel to fill in the sections of your resume.
Section | Details |
|---|---|
Contact Information | First Name, Last Name, and Email are pre-filled from your account. You can add a phone number, address, and website link. |
Personal Summary | Write a brief introduction about yourself and your career goals. |
Experience and Activities | Add details for Education, Work Experience, Extra-Curricular Activities, Volunteer Experience, Achievements, Certifications, and Hobbies. |
Add Items | Click the + Add button within a section to add a new entry (e.g., a new job or school). You can add up to 20 items per section. |
Details | Include start/end dates, locations, and descriptions. If you are currently in a role, leave the End Date blank and it will display as "Present". |
2. Manage Sections
You have full control over which sections appear on your resume:
- Hide Sections: Click the eye icon next to a section title (e.g., References) to hide it completely if you do not need it
- Reorder Items: Use the Up and Down arrows within a section to change the order of your list (e.g., moving your most recent volunteer work to the top)
- Reorder Sections: Drag and drop entire sections (e.g., moving "Education" above "Work Experience") to suit the layout you want
3. Customize the Design
Use the Right Panel to change how your resume looks:
- Templates: Choose among multiple different templates to organize the content in your resume
- Formatting: Adjust Fonts, Text Size, and Colors to match your personal style
- Live Preview: As you type or change settings, the document in the center of the screen updates instantly so you can see exactly how it will look
Saving Your Work
The Resume Builder includes Auto-Save. Your changes are automatically saved every 30 seconds, or whenever you close the panel, so you do not need to worry about losing your work.
Managing Your Resumes
The Resumes Dashboard lists all the resumes you have created. Each card shows the resume name and the date it was created. Click the three dots (...) menu on any resume card to:
Option | What it does |
|---|---|
Edit | Open the resume to make changes |
Copy | Create an exact duplicate of a resume. Useful when you want to tailor a specific version for a job application without losing your original. |
Delete | Permanently remove a resume |
Exporting and Downloading
When you are ready to share your resume:
- Open the resume in the editor
- Click the Download button in the header
- Select Download PDF file

- Your browser's print function opens to generate the PDF. You can either print to a printer, or use the "Save as PDF" option.
- Ensure your settings are correct in the print preview window before saving or printing. In particular, uncheck the option to include Headers and Footers. This setting should remain unchecked once you have updated it once.
- After checking the preview, select a printer or Save as PDF, and choose where to save your file.
Cover Letters
myBlueprint+ does not include a dedicated cover letter builder, but you can optionally include one as a custom section within your resume by following the steps below. Students can also create a separate resume solely for their cover letter, and only fill in the custom section, so it exports as its own PDF file.
Step 1: Add a Custom Section
- Scroll to the bottom of the Left Panel
- Click + Add a new section button
- A new generic section appears in your list
Step 2: Rename the Section
- Locate your new section in the Left Panel
- Click the menu button (three lines) next to the section name
- Click Rename and change the title to "Cover Letter" (or leave it blank if you want no header)
Step 3: Add Your Content
- Click Add a new item
- Type out your cover letter content within the "Summary" section. You can use line breaks and rich text formatting here.
- Leave any other fields like Name, Description, and etc. blank
Step 4: Move Cover Letter to Its Own Page
- On the right-hand side, scroll down to the Layout section
- Click Add New Page
- Drag your other resume sections to Page 2, so that the Cover Letter is the only section that appears on Page 1
Step 5: Download
- Click PDF at the top right, or the PDF download button below the resume preview
- Check the preview to ensure your "Cover Letter" section appears correctly at the start of the document
- Select Save as PDF as your destination, then select where to save the file
Helpful Resources
If you get stuck or need inspiration, look for these resources on the Resumes Dashboard:
- Job Readiness Guide: A guide with tips on how to write effective resumes and cover letters
- Helpful Examples: View sample resumes (e.g., "Leslie's Resume" or "Sandra's Resume") to see examples for students with different levels of work experience
Updated on: 24/07/2026
Thank you!